Adding depth to our games, then we have to get ready to go 3D. 3D is not complicated at all and rendering 3D graphics is quite easy using OpenGL ES.
I will break the concepts down to the basics. In a 3D game, as in the real world, everything happens in space. If we were watching a football match from the tribunes, looking down onto the pitch, we would be observing the unfolding action from a perspective. What we would see is defined by the field of view and the players that we “catch” with our eye. We would look at a 3D scene.
There are a few notions to get acquainted to before we can do real 3D programming.
Take a look at the following diagram. It shows a 3D scene.
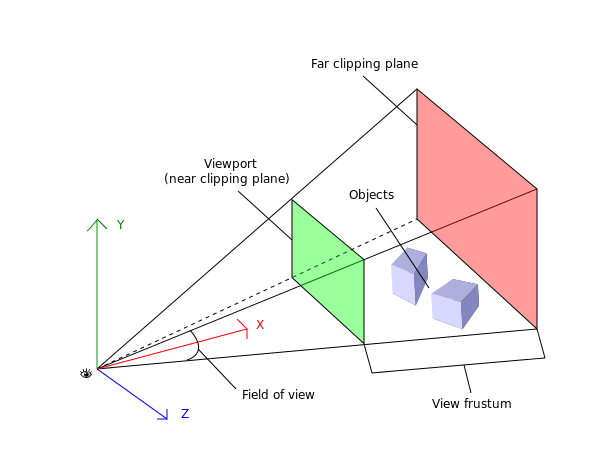
The above 3D scene consists of the following elements:
- Obeserver - the focal point - this is where we stand to observe the scene. It is represented by the eye on the diagram.
- View Frustum - this is a pyramid which has 2 clipping planes. Objects or parts of objects found outside the frustum, won’t be rendered.
- Viewport - is a rectangular plane where all the objects found in the view frustum are projected.
- Field of View - The angle on the Y axis for the extent of the observable world.
Everything you see in the 3D scene makes up the perspective. Perspective projection scales the final image of the objects according to their distance from the observation point. The farther an object is, the smaller it appears, just like in real life.
This is much like a camera. Let’s see how to implement this. We will use triangles in space.
Let’s create an activity with an OpenGL renderer.
 1 public class MainActivity extends Activity {
 2
 3   private GLSurfaceView   glView;
 4   private Triangle    triangle1;
 5   private Triangle    triangle2;
 6
 7   /** Called when the activity is first created. */
 8     @Override
 9     public void onCreate(Bundle savedInstanceState) {
10         super.onCreate(savedInstanceState);
11     requestWindowFeature(Window.FEATURE_NO_TITLE);
12     getWindow().setFlags(WindowManager.LayoutParams.FLAG_FULLSCREEN,
13         WindowManager.LayoutParams.FLAG_FULLSCREEN);
14     glView = new GLSurfaceView(this);
15     glView.setRenderer(new MyOpenGLRenderer());
16         setContentView(glView);
17     }
18
19     class MyOpenGLRenderer implements Renderer {
20
21       @Override
22       public void onSurfaceChanged(GL10 gl, int width, int height) {
23         Log.d("MyOpenGLRenderer", "Surface changed. Width=" + width
24             + " Height=" + height);
25         triangle1 = new Triangle(0.5f, 1, 0, 0);
26         triangle2 = new Triangle(0.5f, 0, 1, 0);
27         gl.glViewport(0, 0, width, height);
28         gl.glMatrixMode(GL10.GL_PROJECTION);
29         gl.glLoadIdentity();
30       GLU.gluPerspective(gl, 45.0f, (float) width / (float) height,
31           0.1f, 100.0f);
32       gl.glMatrixMode(GL10.GL_MODELVIEW);
33       gl.glLoadIdentity();
34       }
35
36       @Override
37       public void onSurfaceCreated(GL10 gl, EGLConfig config) {
38         Log.d("MyOpenGLRenderer", "Surface created");
39       }
40
41       @Override
42     public void onDrawFrame(GL10 gl) {
43       gl.glClearColor(0.0f, 0.0f, 0.0f, 1f);
44       gl.glClear(GL10.GL_COLOR_BUFFER_BIT);
45       gl.glLoadIdentity();
46       gl.glTranslatef(0.0f, 0.0f, -5.0f);
47       triangle1.draw(gl);
48       gl.glTranslatef(2.0f, 0.0f, -5.0f);
49       triangle2.draw(gl);
50     }
51     }
52 }
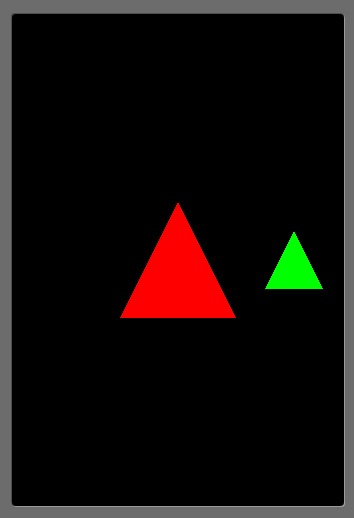
The MainActivity will display two triangles with the same size at different positions. These are triangle1 and triangle2 defined in lines #4 and #5.
The activity’s onCreate method is straightforward but let’s have a recap line by line:
#10 - Call the cunstructor of the super class to handle state.
#11 - Get rid of the window title.
#12 - Makes the window go full-screen.
#14 - Instantiates the GLSurfaceView to access the OpenGL ES API. It is declared as a private member at #03 because we need to use it later on.
#15 - Creates a new instance of our own OpenGL renderer (defined as an inner class at line #19), and sets it to be the renderer of the newly created view.
#16 - Sets the newly created view to be the view of the activity.
The setup is done, let’s move on to the renderer. As you have noticed, we created an inner class MyOpenGLRenderer which implements the Renderer interface. It has 3 methods and these methods are triggered by events from the activity:
onSurfaceCreatedis called every time the drawing surface is created. This can happen when the application starts, or when it becomes active after being sent to the background or when the orientation changes. Note that all these events are triggered after a context loss, so every asset (think loaded images) will be lost and have to be recreated. This is the place where all assets and application objects should be (re)created.onSurfaceChangedoccurs when the screen size changes. This can happen when the device’s orientation changes.onDrawFrameis where the actual drawing happens. It is triggered continuously after every successful draw.
All life-cycle events get passed a GL10 instance through which we can issue commands to OpenGL ES.
We do all our initialisation in the onSurfaceChanged.
#25 - Instantiates triangle1 with a red colour and size 0.5.
#26 - Instantiates triangle2 with a green colour and the same size as triangle1.
#27 - Sets the actual viewport. The first two parameters define the lower left corner, while the next 2 the width and height of it. Width and height in this case is set with values passed by Android’s onSurfaceChanged event. If orientation is not locked, the width and height will swap values every time the surface changes between portrait and landscape.
#28 - Sets the active matrix to be the projection matrix. OpenGL is a state machine and it has 4 internal matrices to work with. It will be discussed in detail, but for now this is how we tell OpenGL to switch to the perspective matrix so we can perform operations on it.
#29 - This is an operation on the active matrix, which is the projection one. It resets it.
#30 - This line sets up the perspective projection. It uses the GLU utiliy provided by Android and it provides convenience methods for common operations. The first parameter is the GL surface, the second parameter is the field of view (fov). The field of view is expressed in degrees and represents the angle on the Y axis. It is the opening of the frustum on the Y axis. The closer the observer is to the viewport, the more it can see “through” it.
The 3rd parameter is the aspect ratio and it is width/height ratio. Think of a TV set (16:9).
The 4th parameter defines the near clipping plane and it is always a positive value.
The 5th and last parameter is the far clipping plane. Everything after this plane won’t be rendered.
#32 - Sets the active matrix to be the model view matrix. Every command sent to OpenGL or operation
performed, will affect this matrix. This matrix affects the scene and the objects in it.
#33 - Resets the model view matrix.
In the onDrawFrame we simply issue a series of commands to draw the scene.
#43 - Sets the clear values for the colour buffer to opaque black. The attributes are (red, green, blue, alpha) taking values between 0 and 1. 1 being the highest intensity while 0 meaning “no” intensity. For the alpha component 0 is transparent and 1 is opaque.
#44 - Issue the command to clear the colour buffer, thus the screen.
#45 - Resets the current matrix which is the model view from the onSurfaceChange.
#46 - We issue a command that creates a translation in the model view matrix. The first parameters says how much to translate on the X axis, the second on the Y axis and the third on the Z axis. As we set up the viewport, X points RIGHT, Y points UP and Z points TOWARDS US out of the screen. So by translating with -5, we tell OpenGL to move INTO the screen 5 units.
Note that OpenGL does not work with pixels as measures, but with units and fractions of units. We will have to decide how many units an object will have. For example 1 unit in OpenGL can be 1 meter in the real world, so a human can be 1.8 unit tall.
#47 - Draw triangle1. It will be drawn 5 units into the screen.
#48 - We instruct OpenGL to move further 5 units INTO the screen (meaning farther) and 2 units to the right. The translation will be made FROM the last position.
#49 - Draw the second triangle (the green one).
The result will show the scaling of the triangles. The green triangle is the same size as the red one but it appears smaller because it is farther away.
When doing orthographic projection, the Z component is completely ignored and there is no scaling effect.
The following listing shows the Triangle used, but you don’t have to worry about understanding it, as I will cover the vertex buffers shortly.
public class Triangle {

  private FloatBuffer vertexBuffer;
  private float base = 1.0f;
  private float red, green, blue;
  private float vertices[] = {
        -0.5f, -0.5f, 0.0f,        // V1 - first vertex (x,y,z)
           0.5f, -0.5f, 0.0f,        // V2 - second vertex
           0.0f,  0.5f, 0.0f         // V3 - third vertex
  };

  public Triangle(float scale, float red, float green, float blue) {
    vertices = new float[] {
            -base * scale, -base * scale, 0.0f, // V1 - first vertex
             base * scale, -base * scale, 0.0f, // V2 - second vertex
               0.0f,  base * scale, 0.0f          // V3 - third vertex
      };
    this.red = red;
    this.green = green;
    this.blue = blue;
    ByteBuffer byteBuffer = ByteBuffer.allocateDirect(3 * 3 * 4);
    byteBuffer.order(ByteOrder.nativeOrder());
    vertexBuffer = byteBuffer.asFloatBuffer();
    vertexBuffer.put(vertices);
    vertexBuffer.flip();
  }

  public void draw(GL10 gl) {
    gl.glEnableClientState(GL10.GL_VERTEX_ARRAY);
    // set the colour for the triangle
    gl.glColor4f(red, green, blue, 0.5f);
    // Point to our vertex buffer
    gl.glVertexPointer(3, GL10.GL_FLOAT, 0, vertexBuffer);
    // Draw the vertices as triangle strip
    gl.glDrawArrays(GL10.GL_TRIANGLES, 0, vertices.length / 3);
    // Disable the client state before leaving
    gl.glDisableClientState(GL10.GL_VERTEX_ARRAY);
  }
}