Using libGDX with Kotlin
I’ve been reading lately about different languages and what they can bring to the already crowded table of software developers, and one language stood out for me: Kotlin. (https://kotlinlang.org/)
It’s a relatively new language (est. 2011) and these are just a few reasons why I picked it over the multitude of other more mature languages:
- Runs on the JVM and has full Java interoperability
- It’s neither a pure OO nor functional language, it accommodates both styles naturally
- It supports procedural programming with the use of functions
- It has type inference and support for both nullable and non-nullable datatypes
- Its syntax is lovely, especially the Pascal style variable declarations (data types come after the variables)
- It is very concise and I found code written in Kotlin to be very readable
Setting up the project
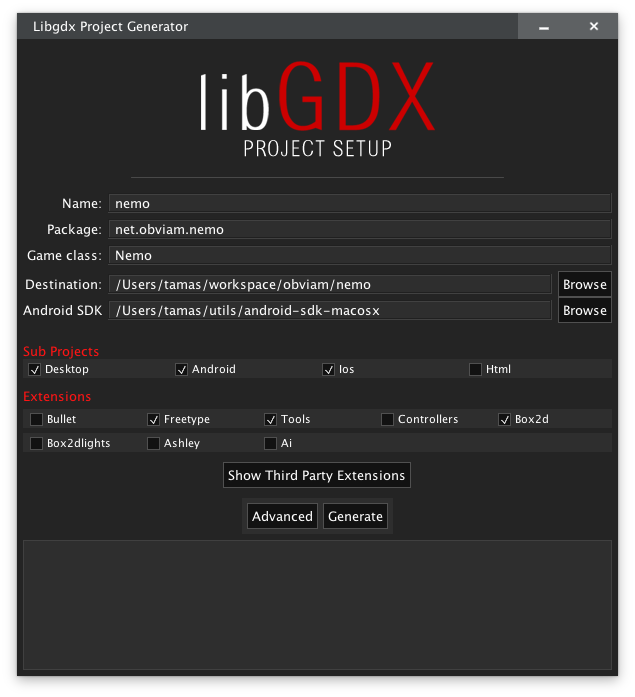
I will be using the standard libGdx setup as recommended and described in the wiki (https://github.com/libgdx/libgdx/wiki/Project-Setup-Gradle), with Gradle as my build tool and IntelliJ as my IDE.
I will call my project Nemo, because it has no name and that’s what “nemo” is in Latin (none, no one, nobody, no name). We will see where we go with it.
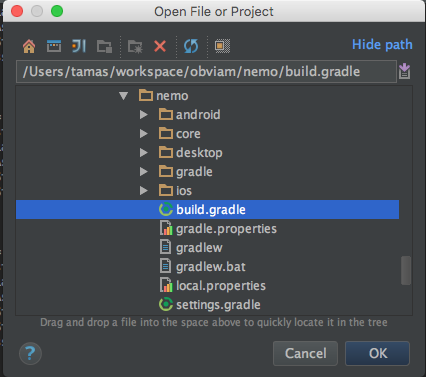
Once the project is created, import it into your IDE. Usually importing/opening the build.gradle file from the root project root.

After the project has been imported, upgrade libGdx. The latest setup tool contains the latest versions, but to do it manually, open the root build.gradle file where all the dependencies are defined and use the latest version of libGdx.
The latest versions can be found here: https://libgdx.badlogicgames.com/versions.html
Change the gdxVersion to the latest, currently this is 1.8.0.
Also make sure that your IDE is ready for Kotlin.
To set up IntelliJ, follow the instructions here: https://kotlinlang.org/docs/tutorials/getting-started.html
Note: To upgrade the plugin to a more recent version of Kotlin, the only way I managed to do it, is to uninstall the plugin and re-add it.
For eclipse users, the instructions are here: https://kotlinlang.org/docs/tutorials/getting-started-eclipse.html
Because we are using Gradle as our build tool, we need to configure it to use the kotlin plugin to build the project. To do this, the kotlin-gradle plugin dependency needs to be added to the buildscript method found in the main build.gralde file.
Add the line
classpath 'org.jetbrains.kotlin:kotlin-gradle-plugin:1.0.0-beta-4584'
to the buildscript dependencies in the main build.gradle file.
The root build.gradle file should contain something like this
 1 buildscript {
 2    repositories {
 3        mavenCentral()
 4        maven { url "https://oss.sonatype.org/content/repositories/snapshots/" }
 5    }
 6    dependencies {
 7        classpath "com.android.tools.build:gradle:1.2.3"
 8        classpath "org.robovm:robovm-gradle-plugin:1.12.0"
 9        classpath "org.jetbrains.kotlin:kotlin-gradle-plugin:1.0.0-beta-4584"
10    }
11 }
The version number can be obtained from Kotlin’s repository at maven central.
http://mvnrepository.com/artifact/org.jetbrains.kotlin/kotlin-gradle-plugin
More information on how to use Kotlin with Gradle can be found here: https://kotlinlang.org/docs/reference/using-gradle.html
In order to target the JVM, the Kotlin plugin needs to be applied.
Add
apply plugin: "kotlin"
to the “core” project, because we are going to use Kotlin just in the “core”.
The Kotlin standard library also needs to be added to the core dependencies.
compile "org.jetbrains.kotlin:kotlin-stdlib:$kotlinVersion"
Note: kotlinVersion is defined at the project level in allProjects.ext.
 1 allprojects {
 2    apply plugin: "eclipse"
 3    apply plugin: "idea"
 4
 5    version = '1.0'
 6    ext {
 7        appName = "nemo"
 8        gdxVersion = '1.8.0'
 9        roboVMVersion = '1.12.0'
10        box2DLightsVersion = '1.4'
11        ashleyVersion = '1.7.0'
12        aiVersion = '1.7.0'
13        kotlinVersion = '1.0.0-beta-4584'
14    }
15
16    repositories {
17        mavenCentral()
18        maven { url "https://oss.sonatype.org/content/repositories/snapshots/" }
19        maven { url "https://oss.sonatype.org/content/repositories/releases/" }
20    }
21 }
For the latest version please consult the Kotlin website.
The core project setup should look like this:
 1 project(":core") {
 2    apply plugin: "java"
 3    apply plugin: "kotlin"
 4
 5
 6    dependencies {
 7        compile "com.badlogicgames.gdx:gdx:$gdxVersion"
 8        compile "com.badlogicgames.gdx:gdx-box2d:$gdxVersion"
 9        compile "com.badlogicgames.gdx:gdx-freetype:$gdxVersion"
10        compile "org.jetbrains.kotlin:kotlin-stdlib:$kotlinVersion"
11    }
12 }
Note: the highlighted lines contain the changes.
Kotlin can be mixed with Java, and because the plan is to use only Kotlin, we won’t extract the Kotlin sources into different directories, instead we will gradually convert the current Java ones to Kotlin.
Luckily we have only one class to convert.
We can do it in a few ways. If you are using IntelliJ, the easiest way is to select the class, from the Tools menu, and select Convert Java file to Kotlin file.
There are other ways too, for instance create an empty file with the .kt extension, copy the content of the Java file and paste it into the new .kt file. IntelliJ will prompt you to convert it.
Of course, all this is possible only if the Kotlin plugin is installed and enabled.
Let’s examine the Nemo class file, which is generated by the gdx setup app:
package net.obviam.nemo;

import com.badlogic.gdx.ApplicationAdapter;
import com.badlogic.gdx.Gdx;
import com.badlogic.gdx.graphics.GL20;
import com.badlogic.gdx.graphics.Texture;
import com.badlogic.gdx.graphics.g2d.SpriteBatch;

public class Nemo extends ApplicationAdapter {
  SpriteBatch batch;
  Texture img;

  @Override
  public void create () {
     batch = new SpriteBatch();
     img = new Texture("badlogic.jpg");
  }

  @Override
  public void render () {
     Gdx.gl.glClearColor(1, 0, 0, 1);
     Gdx.gl.glClear(GL20.GL_COLOR_BUFFER_BIT);
     batch.begin();
     batch.draw(img, 0, 0);
     batch.end();
  }
}
and the generated Kotlin file:
 1 package net.obviam.nemo
 2
 3 import com.badlogic.gdx.ApplicationAdapter
 4 import com.badlogic.gdx.Gdx
 5 import com.badlogic.gdx.graphics.GL20
 6 import com.badlogic.gdx.graphics.Texture
 7 import com.badlogic.gdx.graphics.g2d.SpriteBatch
 8
 9 class Nemo : ApplicationAdapter() {
10    internal var batch: SpriteBatch
11    internal var img: Texture
12
13    override fun create() {
14        batch = SpriteBatch()
15        img = Texture("badlogic.jpg")
16    }
17
18    override fun render() {
19        Gdx.gl.glClearColor(1f, 0f, 0f, 1f)
20        Gdx.gl.glClear(GL20.GL_COLOR_BUFFER_BIT)
21        batch.begin()
22        batch.draw(img, 0f, 0f)
23        batch.end()
24    }
25 }
The automatic conversion is not perfect and if we compile the class we get two errors:
Error:(9, 4) Gradle: Property must be initialized or be abstract
Error:(10, 4) Gradle: Property must be initialized or be abstract
The errors refer to the 2 uninitialised class properties in the highlighted lines (10 and 11).
internal var batch: SpriteBatch
internal var img: Texture
In Kotlin, declared non null properties have to be initialised in the constructor or the class’s init method. But doing so, we won’t be using the libGdx lifecycle methods, so we can apply one Kotlin feature: the Late Initialized Properties. It is achieved by using the lateinit modifier.
internal lateinit var batch: SpriteBatch
internal lateinit var img: Texture
This marks the properties for late initialisation and any access to the properties before they’ve been initialised, will be signalled by a special exception.
That’s it, we have our Kotlin libGdx project.
We can build it and run it the usual way.
The simplest way is to run it from the command line with the Gradle wrapper.
In the project’s root, execute the following command (linux, OSX):
./gradlew desktop:run
or on Windows
gradlew.bat desktop:run
or by following the instructions found in the wiki:
https://github.com/libgdx/libgdx/wiki/Project-Setup-Gradle
The very familiar bootstrap screen should show up.

Next we will explore some common tasks in game development and how those can be achieved with Kotlin.