In this part I will try to explain how to design easily extensible and maintainable game elements that control their own internal state and behaviours.
An internal state is best described as being the soul and mind of the entity. In the [first part][1] I described why composition is better than inheritance. In a nutshell composition provides the means to interchange the algorithms associated with their behaviours. State on the other hand helps objects to control their own behaviours.
If you are not familiar with the behaviours and strategies, I strongly suggest to go and check out the [previous article][1] as I will be picking up those droids and make them utterly clever during the next articles. But first we need to take a closer look to how I design less clever entities, like weapons.
Let’s design an old fashioned rifle and learn from the process how to design the next gen weapons to fend off the invading droid army.
Breaking it down, what can one do with a rifle? Pull the trigger of course and reload (insert, eject the ammo clip).
Now think of all the scenarios. What happens if I pull the trigger and there is no clip? Or when there is one but it’s empty? Apparently a simple thing became a bit more complicated. Let’s see it on paper:
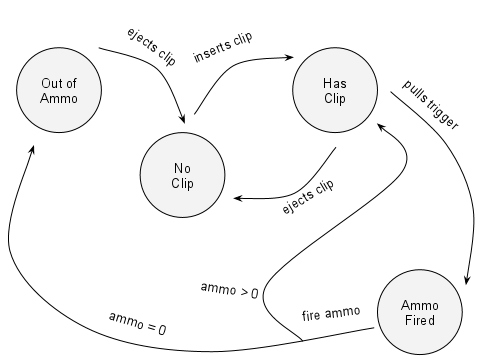
Initial Rifle State Diagram
Let’s examine the diagram and figure out what it is and what is that we want.
The above diagram is called a State Diagram.
Each of those circles is a State and each of those arrows is a State Transition.
Each state is just a different configuration of the rifle. The rifle behaves in certain ways depending in which state it is in and some action is needed to take it to another state. So, to go to another state, you will need to do something like pull the trigger or insert clip. See the arrows on the diagram.
We identify the following states:
- No Clip
- Has Clip
- Ammo fired
- Out of Ammo
and actions (transitions):
- inserts clip
- ejects clip
- pulls trigger
- fire ammo
Note: I used third person for 3 of the actions. It is because the user of the weapon will trigger these actions while fire ammo is more of an internal action.
The whole thing described above is also called a Finite State Machine. It is nothing more than an object that holds a finite number of states that govern behaviour and the object can be in only one state at any given time.
Our First Implementation
Knowing all this, what would be our first choice for the implementation? A class that has all the possible states and actions, right? It should also hold the current state. Simple.
Create the Rifle.java class.
public class Rifle {

    // defining the states
    final static int NO_CLIP        = 0;
    final static int HAS_CLIP       = 1;
    final static int AMMO_FIRED     = 2;
    final static int OUT_OF_AMMO    = 3;

    int state = NO_CLIP;    // instance variable holding the current state
    int ammoCount = 0;      // we count the ammo
}
Great! We created the structure of the rifle. We also want to know when we are out of ammo, so we added the ammoCount variable. They are set to default values. The rifle holds no clip thus the ammo is 0 when it is created.
Now let’s add the actions. But beware! Exposing all the actions to someone handling the weapon is dangerous. What will happen when someone tries to pull out the clip while firing? We need to take these into consideration when triggering the actions.
// **********************
// Creating the actions
// **********************

public void insertClip() {
    // We check each possible state and act according to them
    if (state == HAS_CLIP) {
        System.out.println("There is already a clip loaded.");
    } else if (state == AMMO_FIRED) {
        System.out.println("You'll hurt yourself!!!");
    } else if (state == OUT_OF_AMMO) {
        System.out.println("You need to take out the empty clip first.");
    } else if (state == NO_CLIP) {
        state = HAS_CLIP;
        ammoCount = 10;
        System.out.println("You have loaded a clip with " + ammoCount + " bulletts.");
    }
}

public void ejectClip() {
    if (state == NO_CLIP) {
        System.out.println("The magazine is empty.");
    } else if (state == AMMO_FIRED) {
        System.out.println("You'll hurt yourself!!!");
    } else if (state == HAS_CLIP) {
        // You could still eject it if you want but for the sake of
        // simplicity let's use up the ammo first
        System.out.println("Use up all your ammo first.");
    } else if (state == OUT_OF_AMMO) {
        state = NO_CLIP;
        System.out.println("You have unloaded a clip.");
    }
}

public void pullTrigger() {
    if (state == NO_CLIP) {
        System.out.println("Empty Click!");
    } else if (state == AMMO_FIRED) {
        System.out.println("Jammed!");
    } else if (state == OUT_OF_AMMO) {
        System.out.println("Click! Out of ammo.");
    } else if (state == HAS_CLIP) {
        System.out.println("BANG!!!");
        state = AMMO_FIRED;
        fireAmmo();
    }
}

public void fireAmmo() {
    if (state == NO_CLIP) {
        System.out.println("Empty magazine.");
    } else if (state == AMMO_FIRED) {
        System.out.println("Bullet already on its way to kill someone!");
    } else if (state == OUT_OF_AMMO) {
        System.out.println("Out of ammo.");
    } else if (state == HAS_CLIP) {
        state = AMMO_FIRED;
        ammoCount--;
        System.out.println("Bullet on its way!");
        // we check if the clip is empty
        if (ammoCount == 0) {
            // yes, it's empty
            System.out.println("Darn! Out of ammo");
            state = OUT_OF_AMMO;
        } else {
            state = HAS_CLIP;
        }
    }
}
Let’s put the rifle to the test.
Create the RifleTest.java class.
public class RifleTest {

    public static void main(String[] args) {
        Rifle rifle = new Rifle();
        System.out.println(rifle);

        rifle.insertClip();
        rifle.pullTrigger();
        rifle.pullTrigger();
        rifle.pullTrigger();
        rifle.pullTrigger();

        System.out.println(rifle);

        rifle.insertClip();
        rifle.ejectClip();
        rifle.pullTrigger();
    }
}
It is a very simple scripted scenario which performs some actions on the rifle. Some may be good some bad. As when trying to force in a second clip or pulling the trigger when it’s out of ammo.
Check out the result and examine it carefully. How cool is that? We are the Kalashnikovs of our age.
<< RIFLE [state=Empty Magazine (No Clip), ammo=0] >>
> You have loaded a clip with 3 bulletts.
> BANG!!!
> Bullet on its way!
> BANG!!!
> Bullet on its way!
> BANG!!!
> Bullet on its way!
> Darn! Out of ammo
!* Click! Out of ammo.
<< RIFLE [state=Out of Ammo, ammo=0] >&g;t
!* You need to take out the empty clip first.
> You have unloaded a clip.
<span class="yellow">!* Empty Click! - No clip!</span>
Note that I have omitted the toString() method for the Rifle.
Well done! We have our first state machine.
But
We can’t do much firing bullet by bullet. We need automatic fire! Oh, and we can’t just let people running around with rifles without the safety ON.
Ah, that’s easy, right? We’ll have a few more states and a few more transitions.
But wait, we will need to rework the Rifle class a bit.
Let’s see what we need to modify just to support automatic and manual fire:
- we need to add the two states
- but then we need to modify every single method to handle the states by adding conditional statements
pullTrigger()will get complicated as it will need to know what state it is in and check bullets and fire them as such
That is a LOT of work. It must be some other way.
The Solution
What if we give each state a behaviour and put it into its own class? This way each state will implement its own actions only. We will have the rifle class delegating the action to the state object that represents the current state.
Let’s see how does it look?
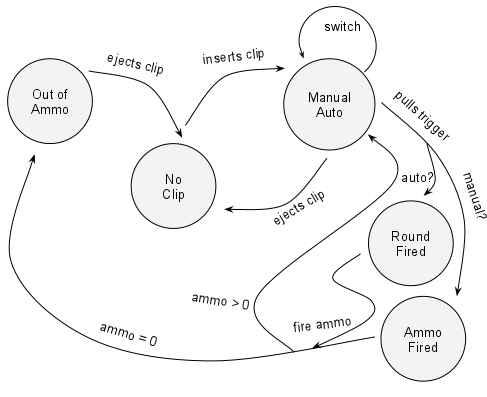
What you should notice is that the Has Clip is now Manual/Auto and has a switch transition. It basically has a sub-state now. Flipping the switch changes the behaviour. Both states will have the pull trigger action but each state will behave differently. This is easily achieved with interfaces, right?
Let’s start coding then. First, let’s create the state interface. Remember, each state will implement its transition and will provide the dummy implementation for the rest. The interface will contain all the actions. The methods map directly to all the actions that can happen with the Rifle
public interface RifleState {

    public void insertClip();
    public void ejectClip();
    public void swithManualAuto();
    public void pullTrigger();
    public void fireAmmo();
}
The new Rifle class will have none of the implemented actions, but will have all the states and will delegate the actions to its current state.
Rifle.java
public class Rifle {

    // the states of the rifle
    RifleState emptyState;
    RifleState autoFireState;
    RifleState manualFireState;
    RifleState outOfAmmoState;
    RifleState roundFiredState;
    RifleState ammoFiredState;

    RifleState state = emptyState;
    int ammoCount = 0;

    // constructor
    public Rifle() {
        // creating states
        this.emptyState         = new NoClipState(this);
        this.autoFireState      = new AutoFireState(this);
        this.manualFireState    = new ManualFireState(this);
        this.outOfAmmoState     = new OutOfAmmoState(this);
        this.roundFiredState    = new RoundFiredState(this);
        this.ammoFiredState     = new AmmoFiredState(this);

        this.state      = this.emptyState;
        this.ammoCount  = 0;
    }
    // convenience methods - delegating only
    public void insertClip() {
        this.state.insertClip();
    }
    public void ejectClip() {
        this.state.ejectClip();
    }
    public void switchManualAuto() {
        this.state.switchManualAuto();
    }
    public void pullTrigger() {
        this.state.pullTrigger();
    }

    // getters and setters
    // ... omitted
}
You see that the class has changed a bit. It has all the states and a current state. It has a constructor too. The constructor is needed to set up the rifle and pass itself as a reference to all of the states to give them access to the rifle’s properties. In our case just the ammo count and current state need to be accessed.
Also the fireAmmo() is missing as it is a state internal action.
Now let’s map the states to actual classes. These are the same as in the original rifle class.
I will list one full class and for the rest only the methods that change the state. Examine the source code for the complete listings.
OutOfAmmoState.java
public class OutOfAmmoState implements RifleState {

    private Rifle rifle;
    public OutOfAmmoState(Rifle rifle) {
        this.rifle = rifle;
    }

    @Override
    public void ejectClip() {
        rifle.setState(rifle.getEmptyState());
        System.out.println("> Clip ejected.");
    }

    @Override
    public void fireAmmo() {
        System.out.println("!* You can't fire with no ammo.");
    }

    @Override
    public void insertClip() {
        System.out.println("!* There is an empty clip inserted already!");
    }

    @Override
    public void pullTrigger() {
        System.out.println("!* Out of ammo!");
    }

    @Override
    public void switchManualAuto() {
        System.out.println("!* Plesea reload first");
    }
}
Notice that the only way out of the OutOfAmmoState is by ejecting the clip.
Every other attempt will do nothing.
Also note the constructor. We are passing the reference to the rifle there.
Check out the other classes too:
AmmoFiredState
public class AmmoFiredState implements RifleState {

    private Rifle rifle;
    public AmmoFiredState(Rifle rifle) {
        this.rifle = rifle;
    }

    @Override
    public void fireAmmo() {
        rifle.setAmmoCount(rifle.getAmmoCount() - 1);
        System.out.println("> Fired 1 bullet.");
        if (rifle.getAmmoCount() == 0) {
            rifle.setState(rifle.getOutOfAmmoState());
        } else {
            rifle.setState(rifle.getManualFireState());
        }
    }
    // ... ommited
}
AutoFireState
public class AutoFireState implements RifleState {

    private Rifle rifle;
    public AutoFireState(Rifle rifle) {
        this.rifle = rifle;
    }

    @Override
    public void ejectClip() {
        rifle.setAmmoCount(0);
        rifle.setState(rifle.getEmptyState());
        System.out.println("> Clip ejected. Please reload.");
    }

    @Override
    public void pullTrigger() {
        System.out.println("> Pulled trigger.");
        rifle.setState(rifle.getRoundFiredState());
        rifle.getState().fireAmmo();
    }

    @Override
    public void switchManualAuto() {
        rifle.setState(rifle.getManualFireState());
        System.out.println("> Switched to manual. Hope they are slow and few!");
    }
    // ... ommited
}
If you follow the diagram then you should be able to figure out the transitions. There is a trick there as the Manual and Auto modes are very similar and I just transition between them. There is a drawback as after a reload, the manual state is the active one even if the auto was set before. But I’m sure you can figure out a quick fix.
ManualFireState
public class ManualFireState implements RifleState {

    private Rifle rifle;
    public ManualFireState(Rifle rifle) {
        this.rifle = rifle;
    }

    @Override
    public void ejectClip() {
        rifle.setAmmoCount(0);
        rifle.setState(rifle.getEmptyState());
        System.out.println("> Clip ejected. Please reload.");
    }

    @Override
    public void pullTrigger() {
        System.out.println("> Pulled trigger.");
        rifle.setState(rifle.getAmmoFiredState());
        rifle.getState().fireAmmo();
    }

    @Override
    public void switchManualAuto() {
        rifle.setState(rifle.getAutoFireState());
        System.out.println("> Switched to auto. Bring'em on!!!");
    }

    // ... ommited
}
NoClipState
public class NoClipState implements RifleState {

    private Rifle rifle;
    public NoClipState(Rifle rifle) {
        this.rifle = rifle;
    }

    @Override
    public void insertClip() {
        rifle.ammoCount = 50;
        rifle.setState(rifle.getManualFireState());
    }

    // ...ommited
}
RoundFiredState
public class RoundFiredState implements RifleState {

    private Rifle rifle;
    public RoundFiredState(Rifle rifle) {
        this.rifle = rifle;
    }

    @Override
    public void fireAmmo() {
        int count = 10;
        while (count > 0 && rifle.getAmmoCount() > 0) {
            System.out.print("> BANG! ");
            rifle.setAmmoCount(rifle.getAmmoCount() - 1);
            count--;
        }
        System.out.println();
        System.out.println("> Fired a round of " + (10 - count) + " bullets. Yeah!");
        if (rifle.getAmmoCount() <= 0) {
            rifle.setAmmoCount(0);
            rifle.setState(rifle.getOutOfAmmoState());
        } else {
            rifle.setState(rifle.getAutoFireState());
        }
    }
    // ...ommited
}
Great! Let’s throw together a test for the new shiny Rifle.
RifleTest
public class RifleTest {

    public static void main(String[] args) {
        Rifle rifle = new Rifle();

        rifle.pullTrigger();
        rifle.ejectClip();
        rifle.insertClip();
        rifle.pullTrigger();
        rifle.switchManualAuto();
        rifle.pullTrigger();
        rifle.pullTrigger();
        rifle.switchManualAuto();
        rifle.pullTrigger();
        rifle.insertClip();
        rifle.switchManualAuto();
        rifle.pullTrigger();
        rifle.pullTrigger();
        rifle.pullTrigger();
        rifle.pullTrigger();
        rifle.pullTrigger();
    }
Examine the output very carefully and go through the source code. You should try adding new features or think of other scenarios.
!* You can't fire with an empty magazine.
!* The magazine is empty.
> Pulled trigger.
> Fired 1 bullet.
> Switched to auto. Bring'em on!!!
> Pulled trigger.
> BANG! >BANG! >BANG! >BANG! >BANG! >BANG! >BANG! > BANG! >BANG! >BANG!
> Fired a round of 10 bullets. Yeah!
> Pulled trigger.
> BANG! >BANG! >BANG! >BANG! >BANG! >BANG! >BANG! > BANG! >BANG! >BANG!
> Fired a round of 10 bullets. Yeah!
> Switched to manual. Hope they are slow and few!
> Pulled trigger.
> Fired 1 bullet.
!* Clip is already present!
> Switched to auto. Bring'em on!!!
> Pulled trigger.
> BANG! >BANG! >BANG! >BANG! >BANG! >BANG! >BANG! > BANG! >BANG! >BANG!
> Fired a round of 10 bullets. Yeah!
> Pulled trigger.
> BANG! >BANG! >BANG! >BANG! >BANG! >BANG! >BANG! > BANG! >BANG! >BANG!
> Fired a round of 10 bullets. Yeah!
> Pulled trigger.
> BANG! >BANG! >BANG! >BANG! >BANG! >BANG! >BANG! >BANG!
> Fired a round of 8 bullets. Yeah!
!* Out of ammo!
!* Out of ammo!
Again, the highlighted lines (starting with a bang (!)) show you when you tried something dodgy.
Voila! We have state machines and easily extensible game elements.
I strongly encourage you to extend it and build your own, as it is a very important element of game design.
You can apply this principle for the whole game and infrastructure. Think of the game as a whole and when you’re on the menu screen (that’s the Menu State), when you’re in the paused screen, that’s the Pause State, or the main screen that’s the Running State. You could create a framework and easily add different game states.
I do hope this gave you a good introduction on how to implement state driven behaviours. Note that I used normal Java practices to write the code for clarity. Meaning that when writing a game, especially for Android, you might not need to overload your classes with getters and setters and you should adhere to the optimized ways. You could use public attributes and access them directly for example. But it was not the scope of this article.
Also understanding this is crucial to make a step towards autonomous agents (automatons). Next time I will introduce event and/or message driven behaviours. We will return to our beloved droids to give them wits to outrun you.
Note that the first attempt was renamed to RifleOld.java and RifleOldTest.java