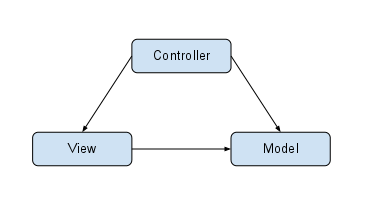
One useful architecture pattern in game development is the MVC (model-view-controller) pattern.
It helps separate the input logic, the game logic and the UI (rendering). The usefulness is quickly noticeable in the early stages of any game development project because it allows to change things quickly without too much rework of code in all layers of the application.
The following diagram is the simplest logical representation of the model view controller concept.
Example Usage
In an example game where the player controls a robot the following can happen:
- 1 - User clicks/taps somewhere on the screen.
- 2 - The controller handles the click/tap and converts the event into an appropriate action. For example if the terrain is occupied by an enemy, an attack action is created, if it is empty terrain, then a move action is created and finally if the place where the user tapped is occupied by an obstacle, do nothing.
- 3 - The controller updates the robot’s (model’s) state accordingly. If the move action was created, then it changes the position, if the attack, then it fires.
- 4 - The renderer (view) gets notified about the state changes and renders the world’s current state.
What this all means is, that the models (robots) don’t know anything about how to draw themselves, or how to change their state (position, hit points). They are dumb entities. In Java they are also called POJOs (plain old java objects).
The controller is in charge of changing the models’ state and notify the renderer.
The renderer has to have a reference to the models (robots and any other entities) and their state, in order to draw them.
We know from the typical game architecture that the main loop acts as a super controller, which updates the states and then renders the objects onto the screen many times a second. We can put all the update and rendering into the main loop along with the robots but that would be messy.
Let’s identify the different aspects (concerns) of our games.
The models
- The droid controlled by the player
- An arena where the droid can move
- Some obstacles
- Some enemies to shoot at
The controllers
- The main loop and the input handler
- Controller to process player input
- Controller to perform actions on the player’s robot (move, attack)
The views
- The world renderer - to render the objects onto the screen
Creating the Project
For simplicity I have chosen the applet this time and will try to keep it very brief. The project has the following structure:
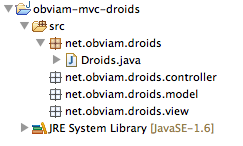
The file Droids.java is the applet and contains the main loop.
package net.obviam.droids;

import java.applet.Applet;
import java.awt.Color;
import java.awt.Event;
import java.awt.Graphics;
import java.awt.image.BufferedImage;

public class Droids extends Applet implements Runnable {

    private static final long serialVersionUID = -2472397668493332423L;

    public void start() {
        new Thread(this).start();
    }

    public void run() {

        setSize(480, 320); // For AppletViewer, remove later.

        // Set up the graphics stuff, double-buffering.
        BufferedImage screen = new BufferedImage(480, 320, BufferedImage.TYPE_INT_RGB);
        Graphics g = screen.getGraphics();
        Graphics appletGraphics = getGraphics();

        long delta = 0l;

        // Game loop.
        while (true) {
            long lastTime = System.nanoTime();

            g.setColor(Color.black);
            g.fillRect(0, 0, 480, 320);

            // Draw the entire results on the screen.
            appletGraphics.drawImage(screen, 0, 0, null);

            // Lock the frame rate
            delta = System.nanoTime() - lastTime;
            if (delta < 20000000L) {
                try {
                    Thread.sleep((20000000L - delta) / 1000000L);
                } catch (Exception e) {
                    // It's an interrupted exception, and nobody cares
                }
            }
            if (!isActive()) {
                return;
            }
        }
    }

    public boolean handleEvent(Event e) {
        return false;
    }
}
Running the above code as an applet does nothing more than setting up the main loop and painting the screen black.
There are 3 packages in the structure and the respective components will go there.
net.obviam.droids.model will contain all the models
net.obviam.droids.view will contain all the renderers
net.obviam.droids.controller will contain all the controllers
Creating the models
The Droid
Droid.java
package net.obviam.droids.model;

public class Droid {

    private float x;
    private float y;
    private float speed = 2f;
    private float rotation = 0f;
    private float damage = 2f;

    public float getX() {
        return x;
    }
    public void setX(float x) {
        this.x = x;
    }
    public float getY() {
        return y;
    }
    public void setY(float y) {
        this.y = y;
    }
    public float getSpeed() {
        return speed;
    }
    public void setSpeed(float speed) {
        this.speed = speed;
    }
    public float getRotation() {
        return rotation;
    }
    public void setRotation(float rotation) {
        this.rotation = rotation;
    }
    public float getDamage() {
        return damage;
    }
    public void setDamage(float damage) {
        this.damage = damage;
    }
}
It is a simple java object without any knowledge of the surrounding world. It has a position, rotation, speed and damage. These states are defined by the member variables and are accessible through the getter and setter methods.
The game requires a few more models: obstacles and enemies on a map. For simplicity the obstacles will have just a position on the map and the enemies will be standing objects. The map will be a 2 dimensional array holding the enemies, obstacles and the droid. The map will be called Arena to differentiate from the standard Java map and will be populated with obstacles and enemies when it is constructed.
Obstacle.java
package net.obviam.droids.model;

public class Obstacle {

    private float x;
    private float y;

    public Obstacle(float x, float y) {
        this.x = x;
        this.y = y;
    }

    public float getX() {
        return x;
    }
    public float getY() {
        return y;
    }
}
Enemy.java
package net.obviam.droids.model;

public class Enemy {

    private float x;
    private float y;
    private int hitpoints = 10;

    public Enemy(float x, float y) {
        this.x = x;
        this.y = y;
    }

    public float getX() {
        return x;
    }
    public float getY() {
        return y;
    }
    public int getHitpoints() {
        return hitpoints;
    }
    public void setHitpoints(int hitpoints) {
        this.hitpoints = hitpoints;
    }
}
Arena.java
package net.obviam.droids.model;

import java.util.ArrayList;
import java.util.List;
import java.util.Random;

public class Arena {

    public static final int WIDTH = 480 / 32;
    public static final int HEIGHT = 320 / 32;

    private static Random random = new Random(System.currentTimeMillis());

    private Object[][] grid;
    private List<Obstacle>    obstacles = new ArrayList<Obstacle>();
    private List<Enemy>       enemies = new ArrayList<Enemy>();
    private Droid droid;

    public Arena(Droid droid) {
        this.droid = droid;

        grid = new Object[HEIGHT][WIDTH];
        for (int i = 0; i < WIDTH; i++) {
            for (int j = 0; j < HEIGHT; j++) {
                grid[j][i] = null;
            }
        }
        // add 5 obstacles and 5 enemies at random positions
        for (int i = 0; i < 5; i++) {
            int x = random.nextInt(WIDTH);
            int y = random.nextInt(HEIGHT);
            while (grid[y][x] != null) {
                x = random.nextInt(WIDTH);
                y = random.nextInt(HEIGHT);
            }
            grid[y][x] = new Obstacle(x, y);
            obstacles.add((Obstacle) grid[y][x]);
            while (grid[y][x] != null) {
                x = random.nextInt(WIDTH);
                y = random.nextInt(HEIGHT);
            }
            grid[y][x] = new Enemy(x, y);
            enemies.add((Enemy) grid[y][x]);
        }
    }

    public List<Obstacle> getObstacles() {
        return obstacles;
    }
    public List<Enemy> getEnemies() {
        return enemies;
    }
    public Droid getDroid() {
        return droid;
    }
}
The Arena is a more complex object but reading through the code should make it easy to understand. It basically groups all the models together into a single world. Our game world is the arena which contains all the elements like our droid, enemies and obstacles.
The WIDTH and HEIGHT are calculated based on the resolution I have chosen. A cell (tile) on the grid will be 32 pixels wide and tall so I just compute how many cells go onto the grid.
In the constructor (line #19) the grid is set up and 5 obstacles and 5 enemies are randomly placed. This will make up the starting arena and our game world.
In order to keep the main loop tidy, we’ll delegate the update and rendering to the GameEngine. This is a simple class that will process the user input, update the states of the models and will render the world. It is a tiny glue framework to make all these happen.
The GameEngine.java stub
package net.obviam.droids.controller;

import java.awt.Event;
import java.awt.Graphics;

public class GameEngine {

    /** handle the Event passed from the main applet **/
    public boolean handleEvent(Event e) {
        switch (e.id) {
        case Event.KEY_PRESS:
        case Event.KEY_ACTION:
            // key pressed
            break;
        case Event.KEY_RELEASE:
            // key released
            break;
        case Event.MOUSE_DOWN:
            // mouse button pressed
            break;
        case Event.MOUSE_UP:
            // mouse button released
            break;
        case Event.MOUSE_MOVE:
            // mouse is being moved
            break;
        case Event.MOUSE_DRAG:
            // mouse is being dragged (button pressed)
            break;
        }
        return false;
    }

    /** the update method with the deltaTime in seconds **/
    public void update(float deltaTime) {
        // empty
    }

    /** this will render the whole world **/
    public void render(Graphics g) {
        // empty
    }
}
To use the engine the Droids.java class needs to be modified. We need to create an instance of the GameEngine class and call the update() and render() methods at the appropriate times. Also we need to delegate the input processing to the engine.
Add the following lines:
Declare the private member and also instantiate it.
private GameEngine engine = new GameEngine();
The modified game loop looks like this:
 1 while (true) {
 2     long lastTime = System.nanoTime();
 3
 4     g.setColor(Color.black);
 5     g.fillRect(0, 0, 480, 320);
 6
 7     // Update the state (convert to seconds)
 8     engine.update((float)(delta / 1000000000.0));
 9     // Render the world
10     engine.render(g);
11
12     // Draw the entire results on the screen.
13     appletGraphics.drawImage(screen, 0, 0, null);
14
15     // Lock the frame rate
16     delta = System.nanoTime() - lastTime;
17     if (delta < 20000000L) {
18         try {
19             Thread.sleep((20000000L - delta) / 1000000L);
20         } catch (Exception e) {
21             // It's an interrupted exception, and nobody cares
22         }
23     }
24 }
The highlighted lines (#7-#10) contain the delegation to the update() and render() methods. Note that there is a conversion to seconds from nano seconds. It’s very useful to work in seconds as we can work with real world values.
Important: The update needs to happen after the delta (time elapsed since the last update) has been calculated. Also the render should be called after the update so it will display the current state of the objects. Note that the screen is cleared each time before the render (painted black).
The last thing to be done is to delegate the input handling.
Replace the current handleEvent method with the following snippet:
public boolean handleEvent(Event e) {
        return engine.handleEvent(e);
    }
Very simple straightforward delegation.
Running the applet yields no particular exciting result. Just a black screen. It makes sense as everything is just a stub apart from the screen being cleared every cycle.
Initialising the models (world)
Our game needs a droid and some enemies. By design, the world is our Arena. By instantiating it, we have created a world (check the constructor in Arena).
We will create the world in the GameEngine as the engine is responsible for telling the view what to render.
We also need the Droid to be created here because the Arena requires it its constructor. Is good to have it separate as the droid will be controlled by the player.
Add the following members to the GameEngine along with the constructor which initialises the world.
private Arena arena;
    private Droid droid;

    public GameEngine() {
        droid = new Droid();
        // position droid in the middle
        droid.setX(Arena.WIDTH / 2);
        droid.setY(Arena.HEIGHT / 2);
        arena = new Arena(droid);
    }
Note: Arena’s constructor needs to be modified, so the Droid gets added to the grid before the obstacles and enemies.
...
    // add the droid
    grid[(int)droid.getY()][(int) droid.getX()] = droid;
...
Running the applet again, won’t change the output but we have our world created. We can add logging to see the result but that won’t be interesting. Let’s create our first view which will reveal our world.
Creating the first View/Renderer
We’ve put a lot of effort in creating the arena and world, we’re eager to actually see it. Because of this, we will create a quick and dirty renderer to reveal the world. By quick and dirty I mean no fancy images or anything but simple squares, circles and placeholders. Once we are happy that the game elements are in we can work on a more elaborate view to replace the squares and circles with fancy graphics. This is where the power of decoupling shines.
Steps to render the world.
- Draw the grid to see where the cells are.
- Obstacles will be drawn as blue squares and they will occupy the cells
- Enemies will be red circles
- The droid will be a green circle with a brown square
First we create the renderer interface. We use this to establish a single way to interact with the renderer and it will make it easy to create more views without affecting the game engine. To read more on why is a good idea check this and this.
Create an interface in the view package.
Renderer.java
package net.obviam.droids.view;

import java.awt.Graphics;

public interface Renderer {
    public void render(Graphics g);
}
That is all. It contains one single method: render(Graphics g). The Graphics g is the canvas that is passed from the applet. Ideally the interface will be agnostic of this and each implementation will use a different back-end but the purpose of this exercise is to describe the MVC not to create a full framework. Because we have chosen applet we need the Graphics object.
The concrete implementation looks like this:
SimpleArenaRenderer.java (in the view package)
 1 package net.obviam.droids.view;
 2
 3 import java.awt.Color;
 4 import java.awt.Graphics;
 5
 6 import net.obviam.droids.model.Arena;
 7 import net.obviam.droids.model.Droid;
 8 import net.obviam.droids.model.Enemy;
 9 import net.obviam.droids.model.Obstacle;
10
11 public class SimpleArenaRenderer implements Renderer {
12
13 	private Arena arena;
14
15 	public SimpleArenaRenderer(Arena arena) {
16 		this.arena = arena;
17 	}
18
19 	@Override
20 	public void render(Graphics g) {
21 		// render the grid
22 		int cellSize = 32; // hard coded
23 		g.setColor(new Color(0, 0.5f, 0, 0.75f));
24 		for (int i = 0; i <= Arena.WIDTH; i++) {
25 			g.drawLine(i * cellSize, 0, i * cellSize, Arena.HEIGHT * cellSize);
26 			if (i <= Arena.WIDTH)
27 				g.drawLine(0, i * cellSize, Arena.WIDTH * cellSize, i * cellSize);
28 		}
29
30 		// render the obstacles
31 		g.setColor(new Color(0, 0, 1f));
32 		for (Obstacle obs : arena.getObstacles()) {
33 			int x = (int) (obs.getX() * cellSize) + 2;
34 			int y = (int) (obs.getY() * cellSize) + 2;
35 			g.fillRect(x, y, cellSize - 4, cellSize - 4);
36 		}
37
38 		// render the enemies
39 		g.setColor(new Color(1f, 0, 0));
40 		for (Enemy enemy : arena.getEnemies()) {
41 			int x = (int) (enemy.getX() * cellSize);
42 			int y = (int) (enemy.getY() * cellSize);
43 			g.fillOval(x + 2, y + 2, cellSize - 4, cellSize - 4);
44 		}
45
46 		// render player droid
47 		g.setColor(new Color(0, 1f, 0));
48 		Droid droid = arena.getDroid();
49 		int x = (int) (droid.getX() * cellSize);
50 		int y = (int) (droid.getY() * cellSize);
51 		g.fillOval(x + 2, y + 2, cellSize - 4, cellSize - 4);
52 		// render square on droid
53 		g.setColor(new Color(0.7f, 0.5f, 0f));
54 		g.fillRect(x + 10, y + 10, cellSize - 20, cellSize - 20);
55 	}
56 }
Lines #13 - #17 declare the Arena object and make sure that it is set when the renderer is constructed. I called it ArenaRenderer because we will render the arena (world).
The only method in the renderer is the render() method. Let’s see what it does step by step.
#22 - Declare a cell size in pixels. It is 32. It’s hard coded as in the Arena class.
#23 - #28 - The grid is being drawn. It is a simple grid. First the colour is set to dark green and lines are drawn at equal distance.
Drawing the obstacles - blue squares
#31 - Set the brush color to blue.
#32 - #36 - Iterate through all the obstacles in the arena and for each it draws a blue filled rectangle slightly smaller than the cell on the grid.
#39 - #44 - Sets the color to red and by iterating through the enemies in the arena, it draws a circle at the respective position.
#47 - #54 - Finally draws the droid as a green circle with a brown square on top.
Note that the arena in the real world has a width of 15 (480 / 32). So the droid will always be at the same position (7, 5) and the renderer works out its position on the screen by using a unit measure conversion. In this case is 1 unit in world coordinate is 32 pixels on the screen.
By modifying the GameEngine to use the newly created view (SimpleArenaRenderer) we get the result.
 1 public class GameEngine {
 2
 3 	private Arena arena;
 4 	private Droid droid;
 5 	private Renderer renderer;
 6
 7 	public GameEngine() {
 8 		droid = new Droid();
 9 		// position droid in the middle
10 		droid.setX(Arena.WIDTH / 2);
11 		droid.setY(Arena.HEIGHT / 2);
12 		arena = new Arena(droid);
13
14 		// setup renderer (view)
15 		renderer = new SimpleArenaRenderer(arena);
16 	}
17
18 	/** ... code stripped ... **/
19
20 	/** this will render the whole world **/
21 	public void render(Graphics g) {
22 		renderer.render(g);
23 	}
24 }
Pay attention to the highlighted lines (5, 15, 22). These are the lines where the renderer (view) is added to the game.
The result should look like the following image (the positions are random apart from the player’s droid):
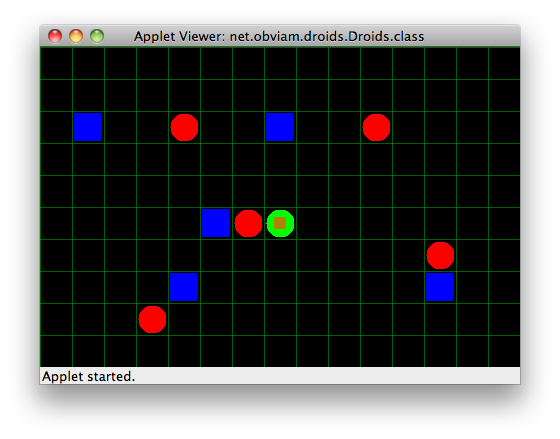
This is a great view to test out the arena and see the models. It’s extremely easy to create a new view that instead of shapes (squares and circles) displays actual sprites.
Controller for Handling Input and Update Models
So far the game does nothing but displays the current state of the world (arena). For simplicity we will update just one state of the droid, its position.
The steps to move the droid based on user input are:
- On mouse up check if the clicked cell on the grid is empty. This means that it does contain any objects which can be
EnemyorObstacleinstances. - If the cell is empty, the controller will create an action that will move the droid at a constant speed until it reaches the destination.
 1 package net.obviam.droids.controller;
 2
 3 import net.obviam.droids.model.Arena;
 4 import net.obviam.droids.model.Droid;
 5
 6 public class ArenaController {
 7
 8 	private static final int unit = 32;
 9 	private Arena arena;
10
11 	/** the target cell **/
12 	private float targetX, targetY;
13 	/** true if the droid moves **/
14 	private boolean moving = false;
15
16 	public ArenaController(Arena arena) {
17 		this.arena = arena;
18 	}
19
20 	public void update(float delta) {
21 		Droid droid = arena.getDroid();
22 		if (moving) {
23 			// move on X
24 			int bearing = 1;
25 			if (droid.getX() > targetX) {
26 				bearing = -1;
27 			}
28 			if (droid.getX() != targetX) {
29 				droid.setX(droid.getX() + bearing * droid.getSpeed() * delta);
30 				// check if arrived
31 				if ((droid.getX() < targetX && bearing == -1)
32 						|| (droid.getX() > targetX && bearing == 1)) droid.setX(targetX);
33 			}
34 			// move on Y
35 			bearing = 1;
36 			if (droid.getY() > targetY) {
37 				bearing = -1;
38 			}
39 			if (droid.getY() != targetY) {
40 				droid.setY(droid.getY() + bearing * droid.getSpeed() * delta);
41 				// check if arrived
42 				if ((droid.getY() < targetY && bearing == -1)
43 						|| (droid.getY() > targetY && bearing == 1)) droid.setY(targetY);
44 			}
45 			// check if arrived
46 			if (droid.getX() == targetX && droid.getY() == targetY)
47 				moving = false;
48 		}
49 	}
50
51 	/** triggered with the coordinates every click **/
52 	public boolean onClick(int x, int y) {
53 		targetX = x / unit;
54 		targetY = y / unit;
55 		if (arena.getGrid()[(int) targetY][(int) targetX] == null) {
56 			// start moving the droid towards the target
57 			moving = true;
58 			return true;
59 		}
60 		return false;
61 	}
62 }
The following breakdown explains the logic and important bits.
#08 - The unit represents how many pixels are in a cell which represents 1 unit in world coordinates. It’s hard-coded and not optimal but for the demo is good enough.
#09 - The Arena the controller will control. It is set when the controller is constructed (line #16).
#12 - The target coordinates of the click in world units.
#14 - It is true when the droid is moving. This is the “move” actions’ state. Ideally this should be a stand alone class, but to demonstrate the controller and keep it concise, we’ll hack an action together inside the controller.
#20 - The update method that updates the position of the droid according to the time passed at a constant speed. It is extremely simple, it checkes both X and Y positions and if they are not the same as the target position, it updates the droid’s respective position (X or Y) considering its speed. If the droid is in the target position, then the move state variable is updated completing the move action.
This is not a very well written action, there is no collision checking on obstacles or enemies found along the way, no path finding. It just updates state.
#52 - The onClick(int x, int y) method will be called when the “mouse up” event occurs. It checks if the clicked cell is empty and if so, then it starts the “move” action by setting the state variable to true
#53-#54 - Converts screen coordinates to world coordinates.
This is the controller. To use it, the GameEngine needs to be updated.
The updated GameEngine.java
 1 package net.obviam.droids.controller;
 2
 3 import java.awt.Event;
 4 import java.awt.Graphics;
 5
 6 import net.obviam.droids.model.Arena;
 7 import net.obviam.droids.model.Droid;
 8 import net.obviam.droids.view.Renderer;
 9 import net.obviam.droids.view.SimpleArenaRenderer;
10
11 public class GameEngine {
12
13 	private Arena arena;
14 	private Droid droid;
15 	private Renderer renderer;
16 	private ArenaController controller;
17
18 	public GameEngine() {
19 		droid = new Droid();
20 		// position droid in the middle
21 		droid.setX(Arena.WIDTH / 2);
22 		droid.setY(Arena.HEIGHT / 2);
23 		arena = new Arena(droid);
24
25 		// setup renderer (view)
26 		renderer = new SimpleArenaRenderer(arena);
27 		// setup controller
28 		controller = new ArenaController(arena);
29 	}
30
31 	/** handle the Event passed from the main applet **/
32 	public boolean handleEvent(Event e) {
33 		switch (e.id) {
34 		case Event.KEY_PRESS:
35 		case Event.KEY_ACTION:
36 			// key pressed
37 			break;
38 		case Event.KEY_RELEASE:
39 			// key released
40 			break;
41 		case Event.MOUSE_DOWN:
42 			// mouse button pressed
43 			break;
44 		case Event.MOUSE_UP:
45 			// mouse button released
46 			controller.onClick(e.x, e.y);
47 			break;
48 		case Event.MOUSE_MOVE:
49 			// mouse is being moved
50 			break;
51 		case Event.MOUSE_DRAG:
52 			// mouse is being dragged (button pressed)
53 			break;
54 		}
55 		return false;
56 	}
57
58 	/** the update method with the deltaTime in seconds **/
59 	public void update(float deltaTime) {
60 		controller.update(deltaTime);
61 	}
62
63 	/** this will render the whole world **/
64 	public void render(Graphics g) {
65 		renderer.render(g);
66 	}
67 }
The changes are highlighted.
#16 - Declare the controller.
#28 - Instantiate the controller.
#46 - Delegating the mouse up event.
#60 - Call the update method on the controller.
Run the applet and you can click on the map and if the cell is empty, the droid will move there.
Excercises
Create a view that will display images/sprites for entities instead of the drawn shapes.
Hint: Use BufferedImage to achieve that.
Extract the move action into a new class.
Add new actions (attack) when an enemy is clicked
_Hint:_Create a bullet entity that gets fired to the target. You can use the move action with a higher speed. When the
hitpointgets down to 0, then the enemy is destroyed. Use a different image to represent different states.
Source Code
Github link coming soon